Windows 8/8.1/10 32/64 bit
Introduction
These instructions are intended for users of the ByteFuse Archiver. The manual contains a description of the sequence of actions for installing, configuring and uninstalling the ByteFuse Archiver.
The ByteFuse archiver is designed to pack one or more files into a single archive file for easy transfer and/or storage of data. The ByteFuse archiver provides the following functions:
- packing one or more files and/or directories into a single archive file;
- unpacking one or more files and/or directories from a single archive file;
- viewing the contents (list of files and/or directories) of a single archive file;
- creating, viewing and unpacking password-protected archives, as well as multi-volume archives;
- expanding the list of supported archive formats by connecting third-party libraries;
- creating, renaming and deleting files and/or directories;
- custom integration with the operating system shell (context menus, file associations).
Technical Requirements
The software and hardware requirements are shown in the table below:
| Operating system | Windows 8/8.1/10 32/64 bit |
|---|---|
| CPU frequency | 1 GHz or higher |
| RAM | 1 GB (for 32-bit system) 2 GB (for 64-bit system) |
| Disk space | 200 MB |
Note: Administrator rights are required to install ByteFuse Archiver. If you don’t have them, contact your organization’s administrator.
General Structure
Main window
The main window of the Archiver consists of the following elements:
- Control panel – consists of the menu File, View, Settings and About the program;
- Files and directories window – is a list of files and directories contained in the selected directory.
Control Panel
File menu
| Menu Item | Meaning |
|---|---|
| Pack to archive | Adding a selected file or set of files to an archive |
| Unpack… | Function to unpack an existing file archive |
| Create directory | Create a new directory |
| Rename | Rename the selected file or directory |
| Delete | Deleting a selected file or set of files |
| Exit | Completion of work with the Archiver |
View menu
| Menu Item | Meaning |
|---|---|
| Path | Displays a search string for files and/or directories |
| Up Button | Displays a button that, when clicked, returns to the previous directory |
| Toolbar | Displays the toolbar |
Menu Settings
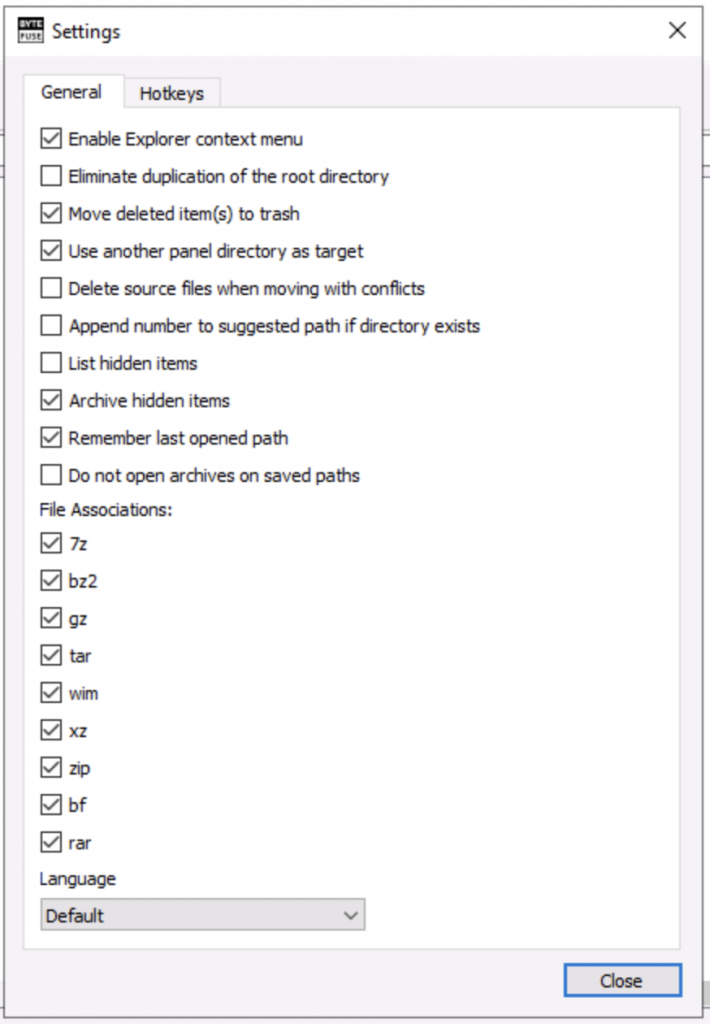
When you call the Settings menu, the screen displays the following menu:

When you check the corresponding boxes, the following options are activated:
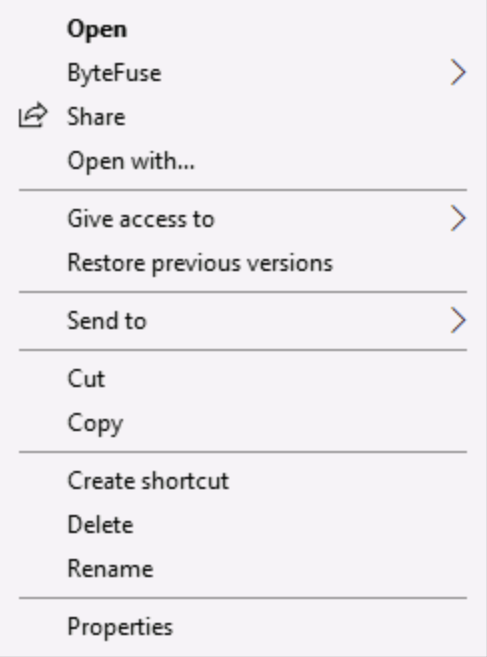
- Enable explorer context menu – in the context menu available by right-clicking in the Windows Explorer window, the ByteFuse item will be displayed with the ability to perform an action to archive or unzip files.
- Eliminate duplication of the root directory – when choosing this option, it will not be possible to create directories with the same names;
- Use large pages when processing archives – the ability to speed up the process of processing archives with support from the operating system;
- Number of threads – the ability to change the number of threads in order to control performance;
- File associations – the ability to set the archiver as the default handler for selected file types.

Working with the archiver
Creating an archive
To create an archive, do the following:
- In the main window of the Archiver, in the window of files and directories, specify one or more files that you intend to pack into an archive, and in the menu bar, click the Pack to archive button
. The Packaging Options window will open:
- In the Packing Options window, specify the required options using the window menu.
- If you intend to create an archive with a password, select the radio button in the Password field and enter a passphrase.
- To create a multi-volume archive, select the size of one volume from the list in the Split into volumes of size (in bytes) menu:
- Click OK to complete the packaging procedure.
The packing procedure status window will open:
The specified file or multiple files will be added to the archive.
Extracting files from an archive
To extract files from an archive, follow these steps:
- In the main window of the Archiver, in the window of files and directories, specify one or more files that you intend to extract from the archive, and in the menu bar, click the button
Unpack the archive. The Unpack Options window will open:
- Specify the unpacking options and click the OK button. The unpacking status window will open:
The specified file or multiple files will be extracted from the archive.
Create a new directory
To create a new directory, follow these steps:
- In the File menu, select the Create catalog option or click the button
on the toolbar.
A new directory named “New Folder” will appear in the list of files and directories.
Renaming a file or directory
To rename a file or directory, do the following:
- In the list of files and directories, select the file or directory you want to rename, and in the File menu select the Rename option or click the button
on the toolbar.
- Enter a new file or directory name.
The selected file or directory will be renamed.
Deleting a file or directory
To delete a file or directory, follow these steps:
- Select the file or directory you want to delete and select the Delete option from the File menu or click the button
on the toolbar.
The selected file or directory will be deleted.
Functional expansion
Currently, the functionality of the Archiver is being expanded by using additional compression algorithms, including modules that use existing archiving and unzipping algorithms, such as UnRAR, 7-zip, etc.
The functionality can be extended by the user by adding downloaded from the respective websites of the developers of the mentioned algorithms (or from the site of the copyright holder of this software), for example, in the format of DLL files, including those distributed under such licenses as, for example, BSD, LGPL, MIT, etc.
Integration with other applications
Integration with third-party applications is possible by running the application’s executable file in command line mode with certain parameters:
1. Open archive:
-c=o -s="filepath"
2. Unpack the archive:
-c=e -s="filePath"
3. Unpack to the current directory:
-c=eh -s="filePath"
4. Pack into archive:
-c=a -s="BaseDirectory" "filePath1" "filePath2" "filePath3"
5. Pack into archive and send:
-c=as -s="BaseDirectory" "filePath1" "filePath2" "filePath3"
